Step by step
Sealing the well and pouring the base
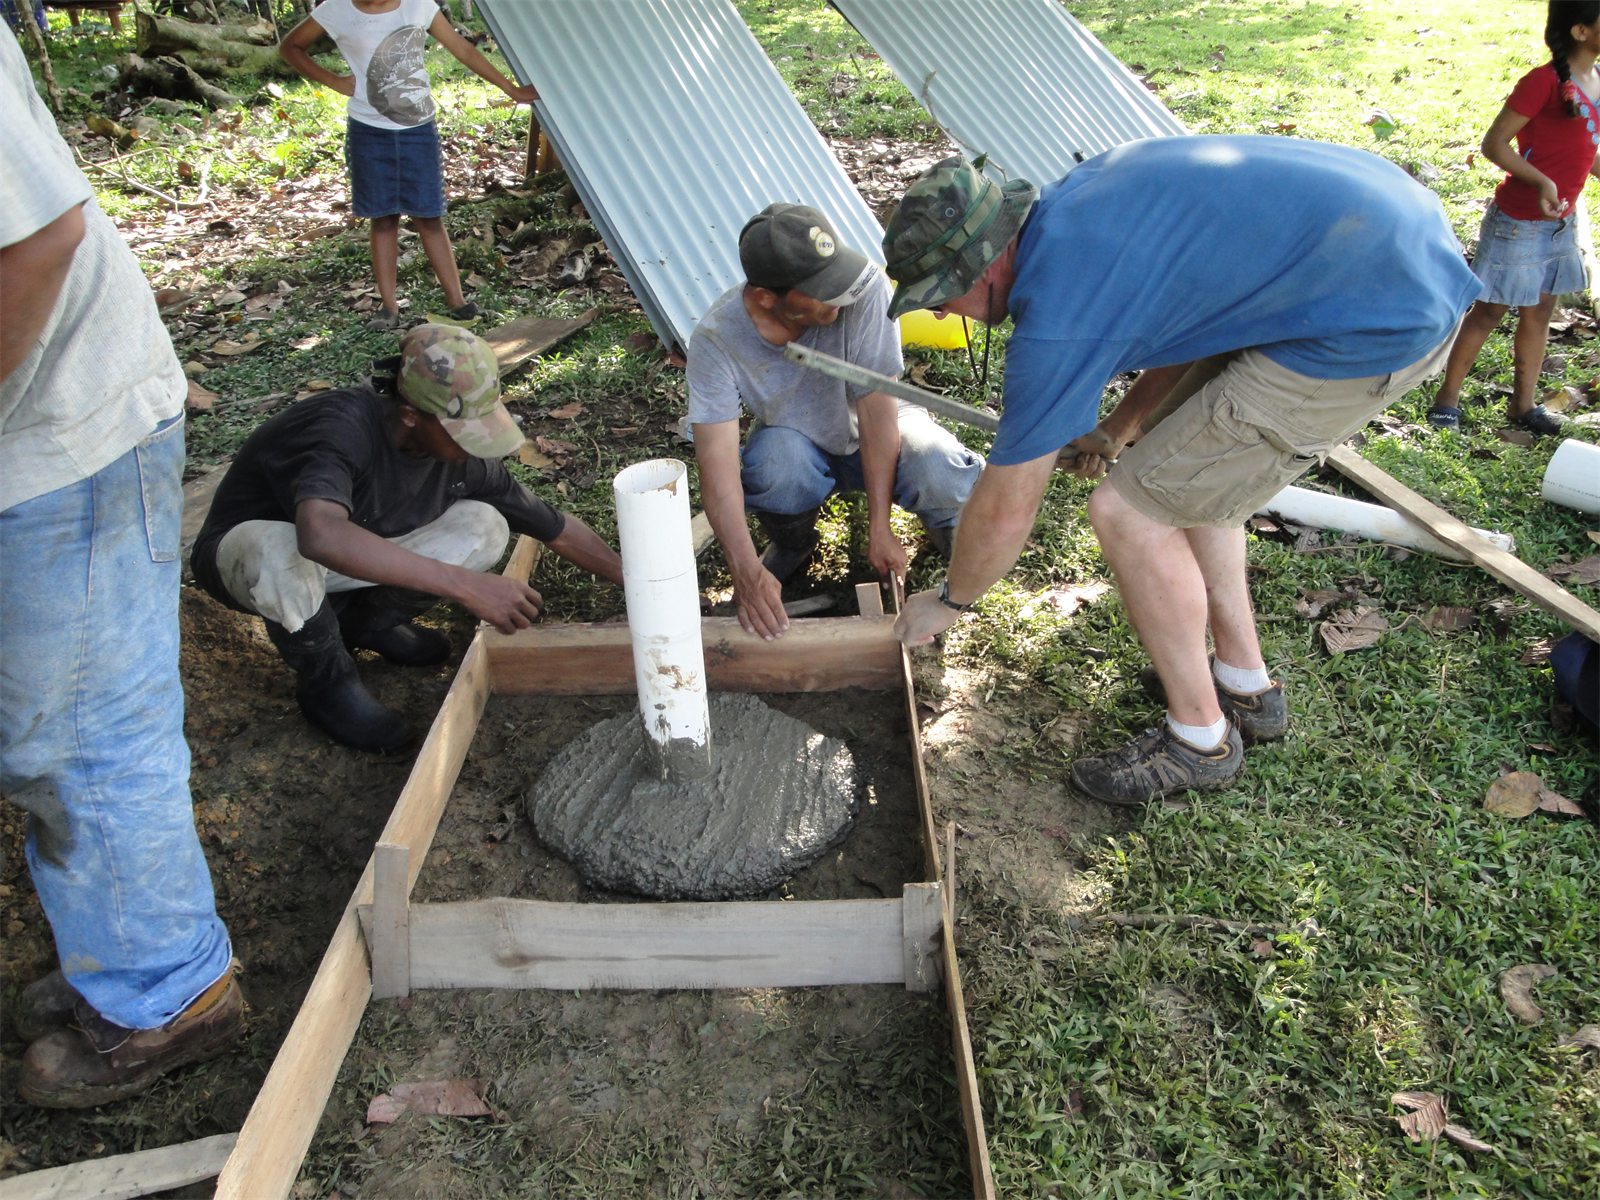
The permanent seal and concrete base protect the well opening and support a connection that can be repaired later.
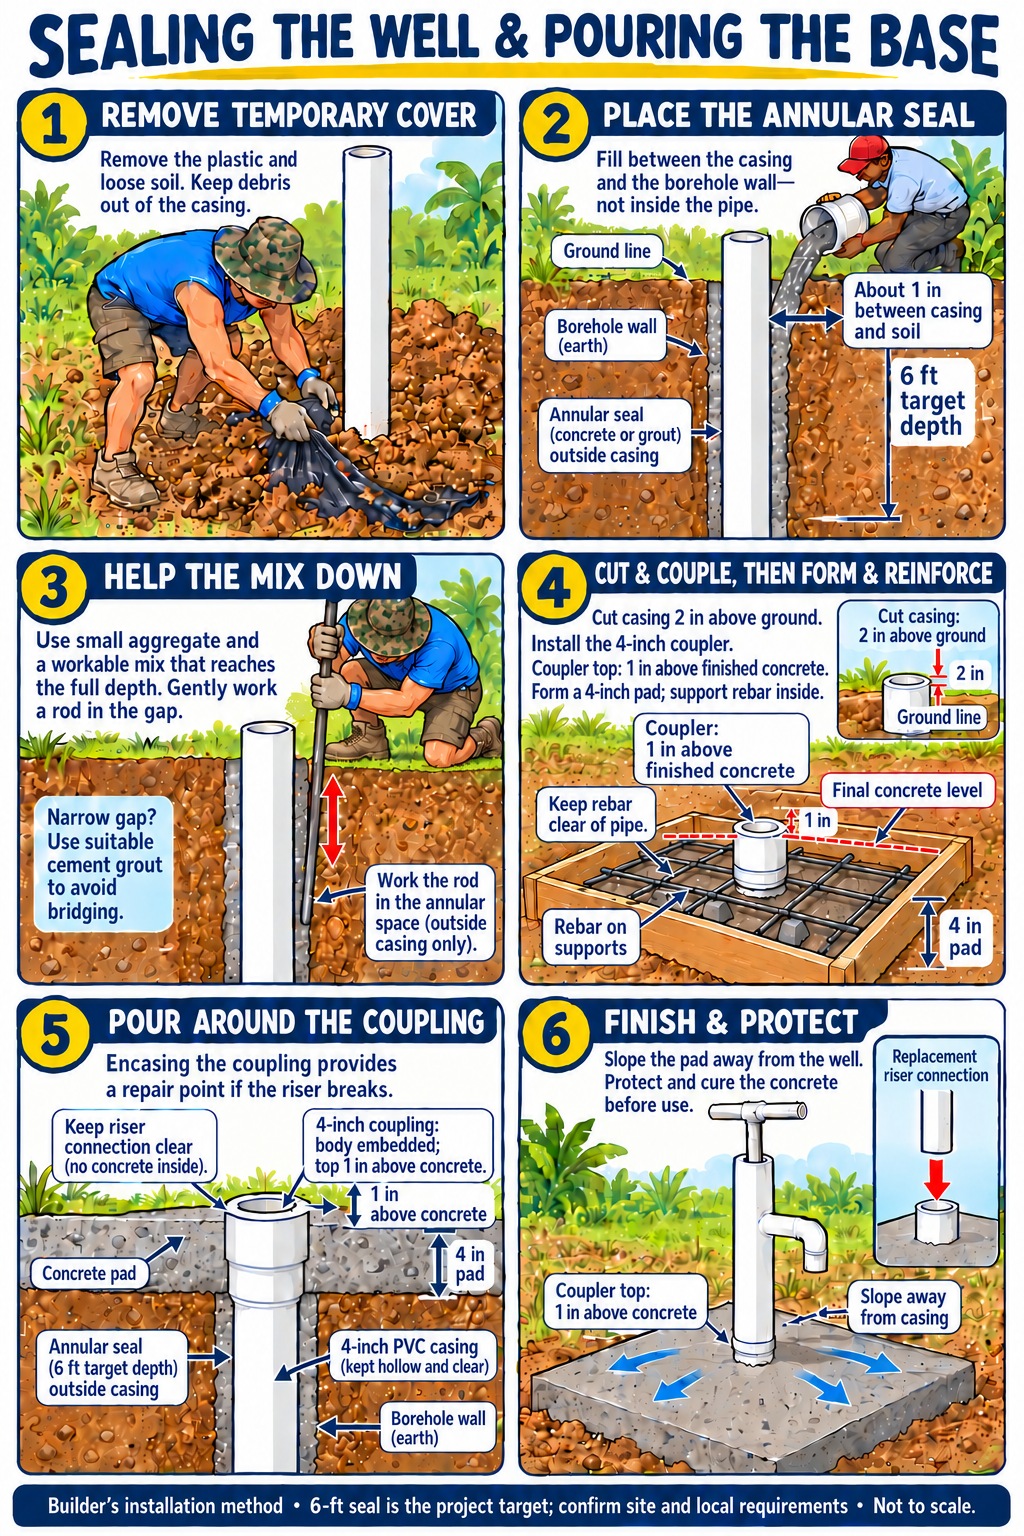
The project’s illustrated annular seal and concrete-base method.
Step 1
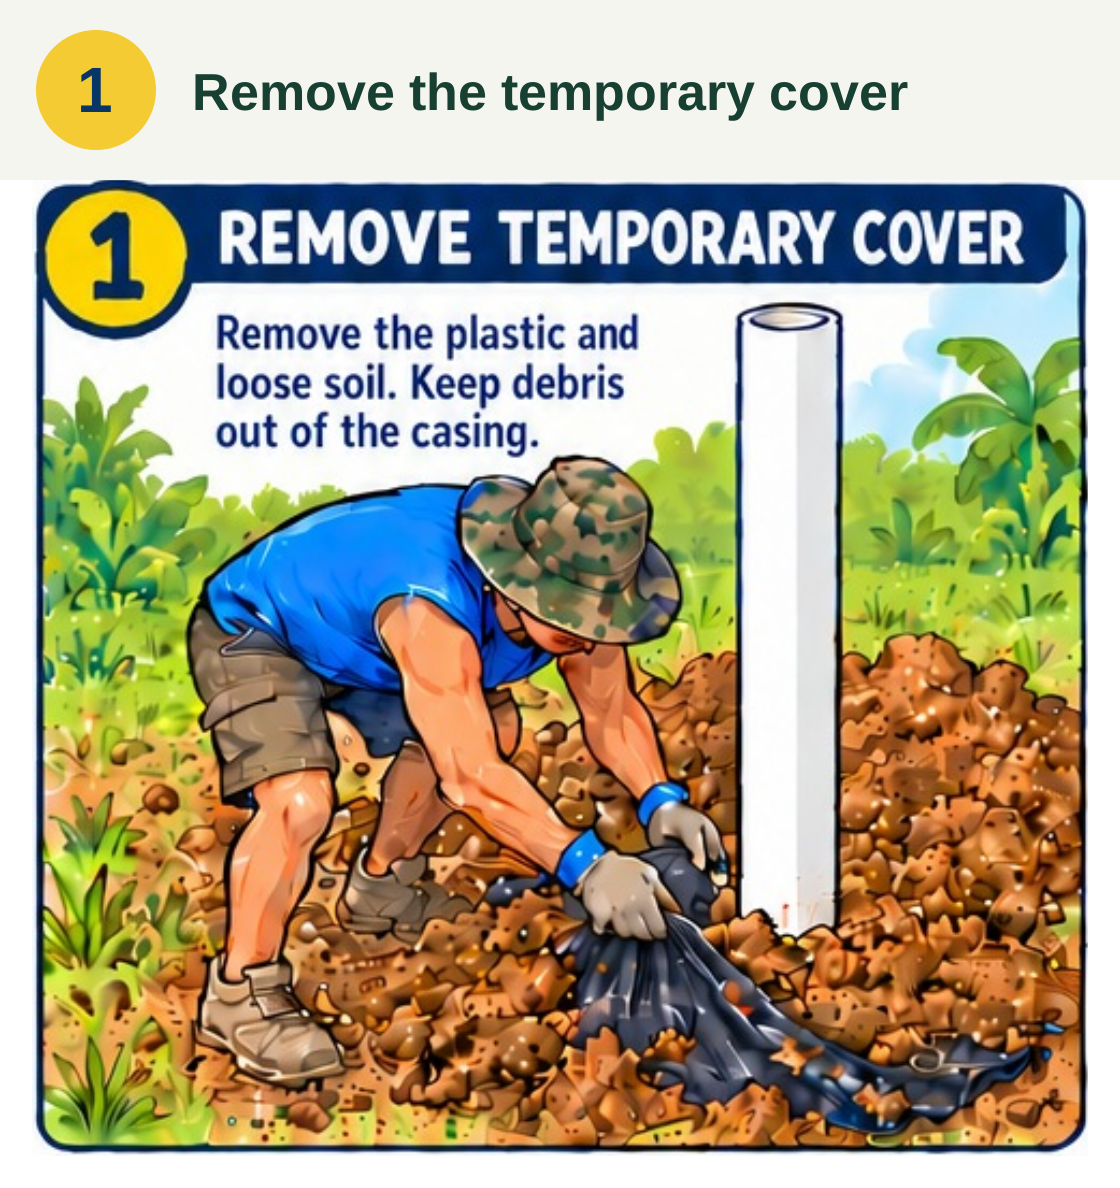
Remove the temporary cover
When the crew returns for the concrete work, the temporary plastic skirt and the loose soil holding it down are removed. The casing opening stays protected while they clear the outside gap, keeping debris from falling into the well.
Remove the temporary plastic skirt and the loose soil holding it down. Work from the outside without dropping debris into the casing. Keep the casing opening protected while preparing the gap for the permanent seal.
Step 2
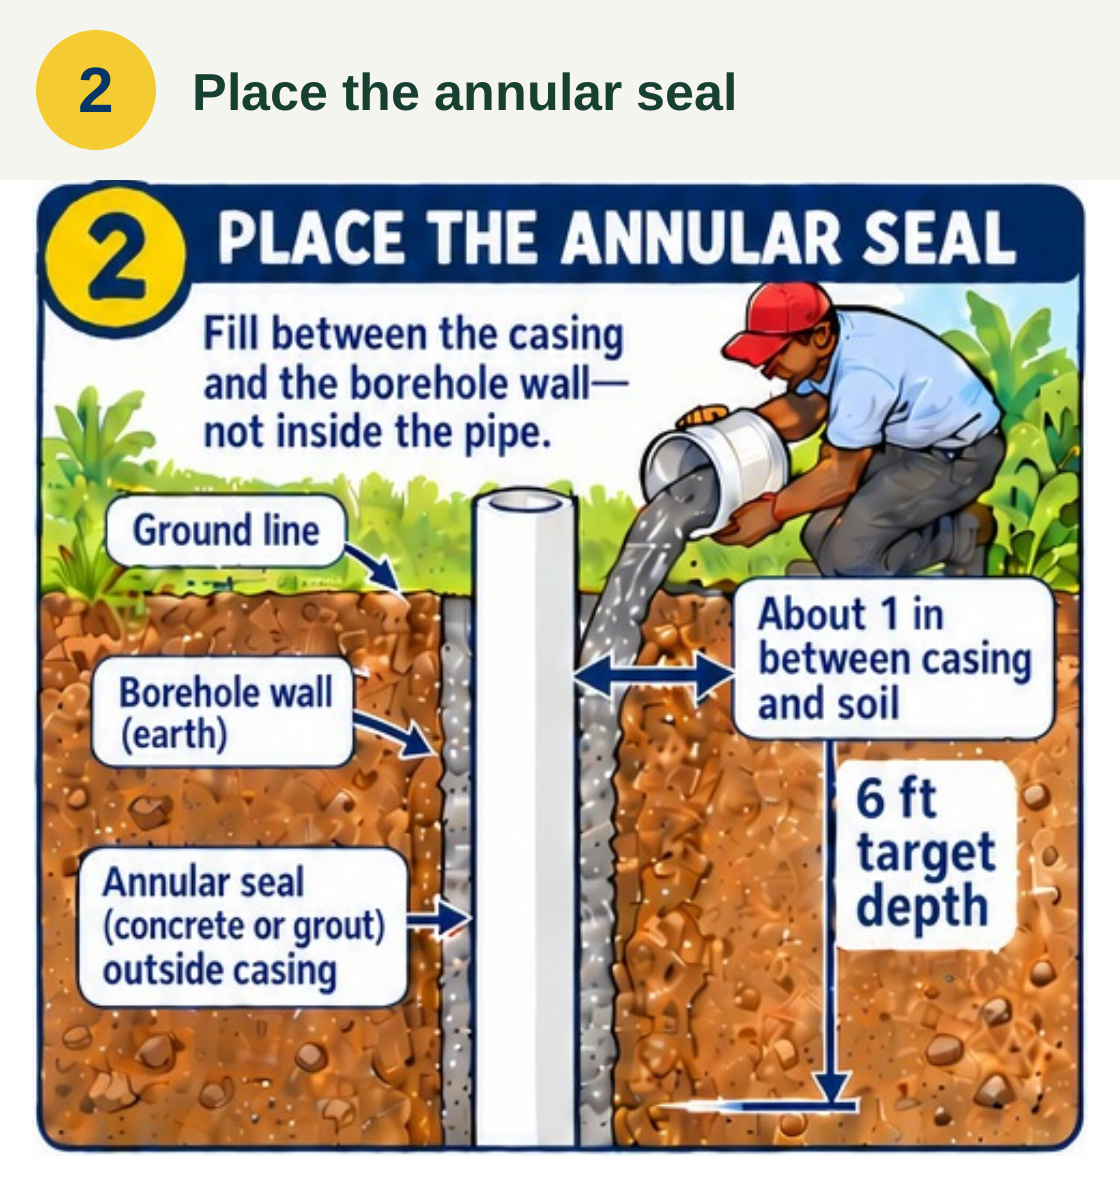
Place the annular seal
The seal goes outside the casing, between the PVC and the earth wall. That gap is usually only about an inch wide. The project aims for a continuous seal about 6 feet deep, so the mix needs to reach down the narrow space rather than collect near the top.
Place sealing material between the casing and the earth wall, never inside the pipe. The gap is usually about 1 inch around the casing. Aim for a continuous outside seal about 6 feet deep, with a mix that can pass through the narrow space.
Step 3
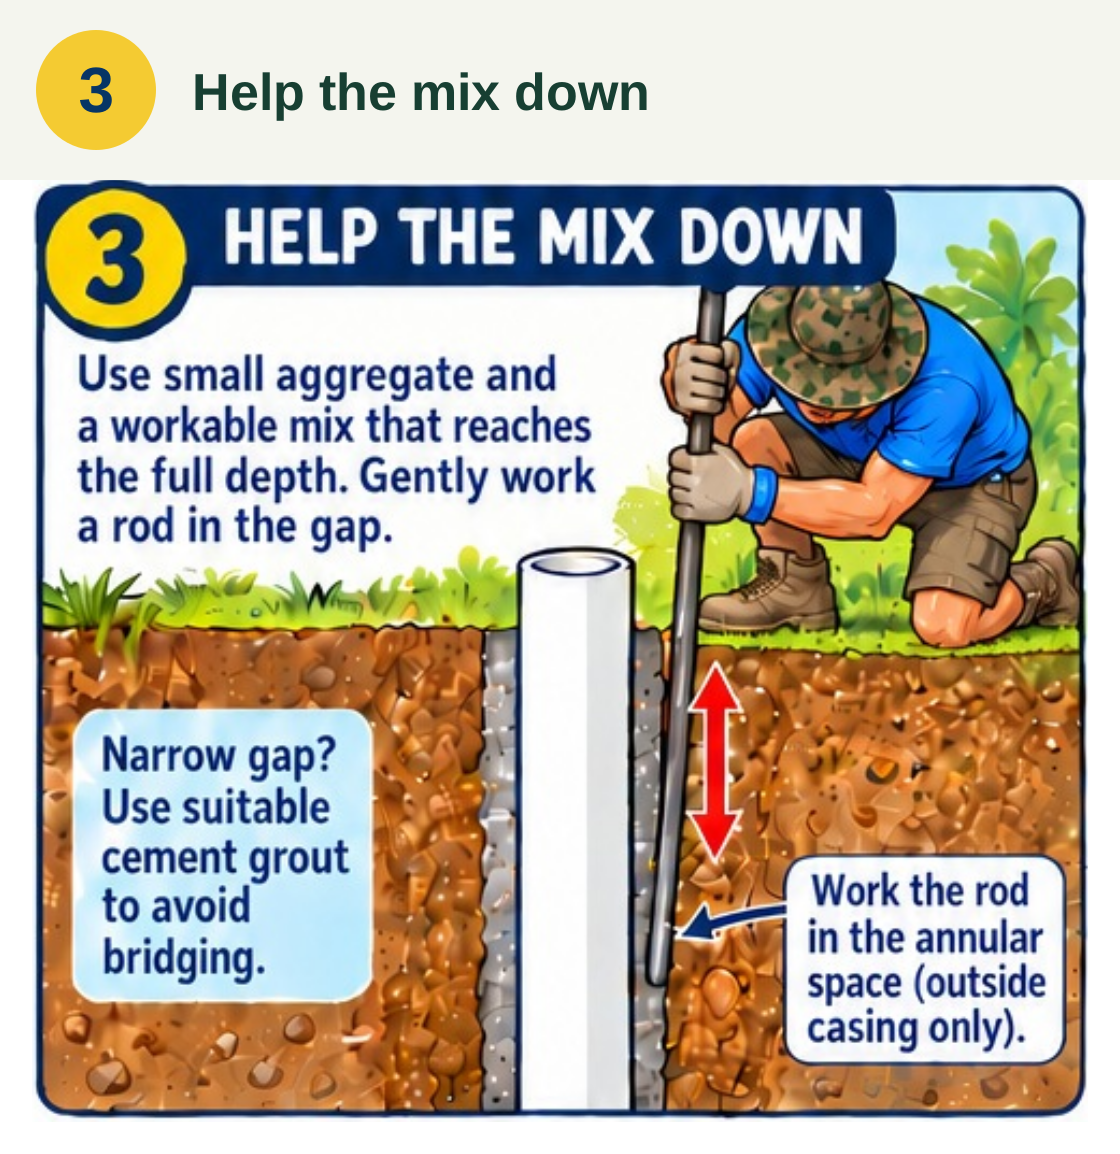
Help the mix down
Small aggregate and a workable mix help the sealing material travel down the gap. The crew uses a rod or stick to help it settle. Suitable cement grout is an alternative when aggregate would bridge near the top and leave an unfilled space below.
Use small aggregate and a workable mix that can reach the full seal depth. Gently move a rod or stick in the outside gap to help the material settle. If the mix bridges near the top, use suitable cement grout rather than leaving an unfilled space below.
Step 4
Cut, couple, form and reinforce
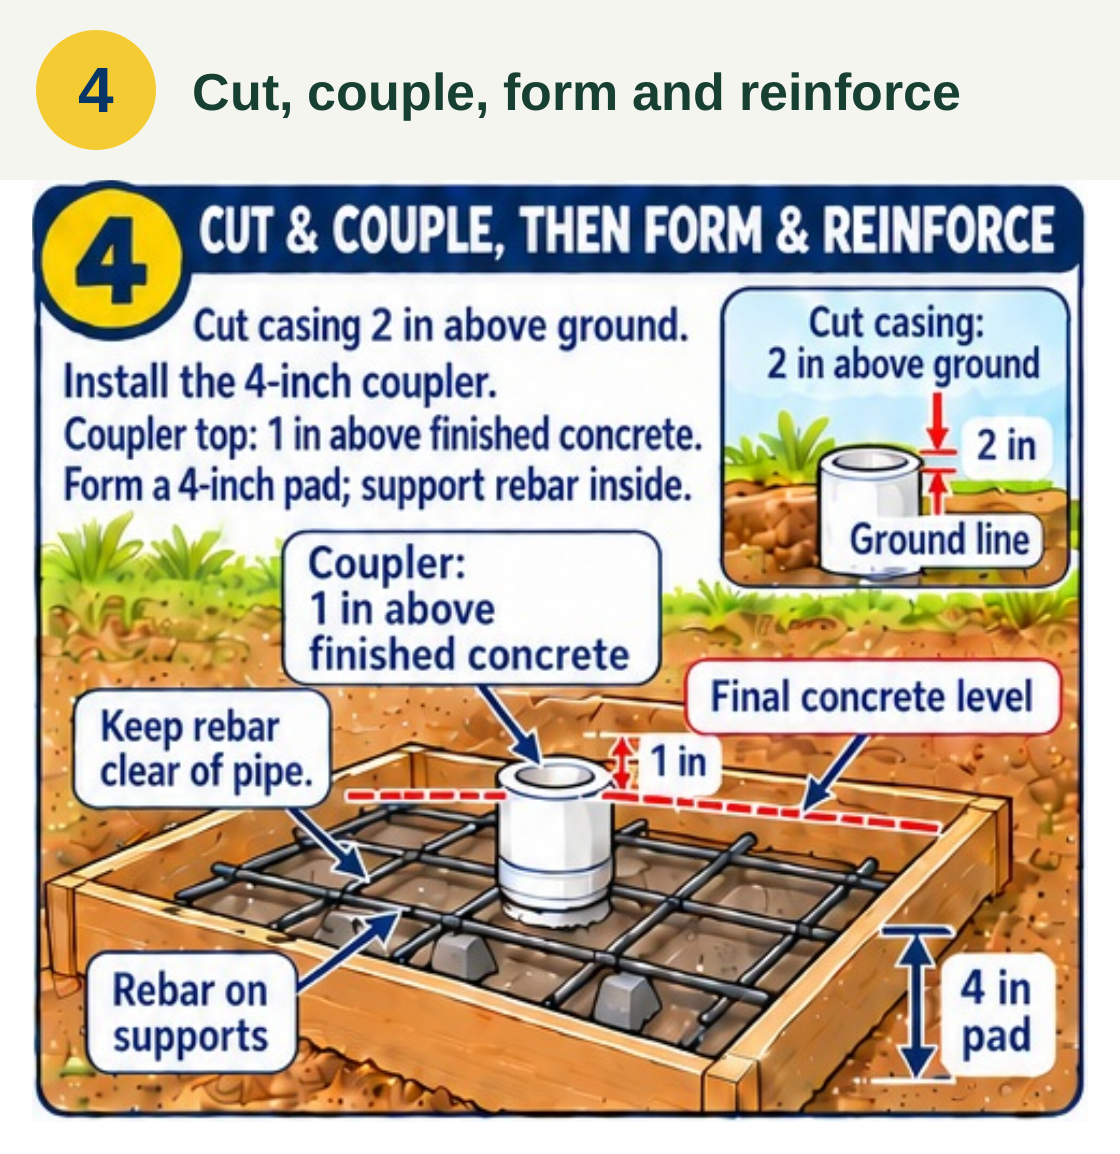
The crew checks the connection height against the planned concrete surface. The casing is cut 2 inches above bare ground, and the coupler’s top will remain 1 inch above the finished slab. Forms define the 4-inch pad, with rebar supported inside the concrete and kept clear of the PVC to help limit cracking.
Cut the casing 2 inches above bare ground. Install the 4-inch coupler with its top 1 inch above the final concrete surface. Form a 4-inch-thick pad and support rebar within it, clear of the PVC. Check the height against the finished slab level before pouring.
Step 5
Pour around the coupling
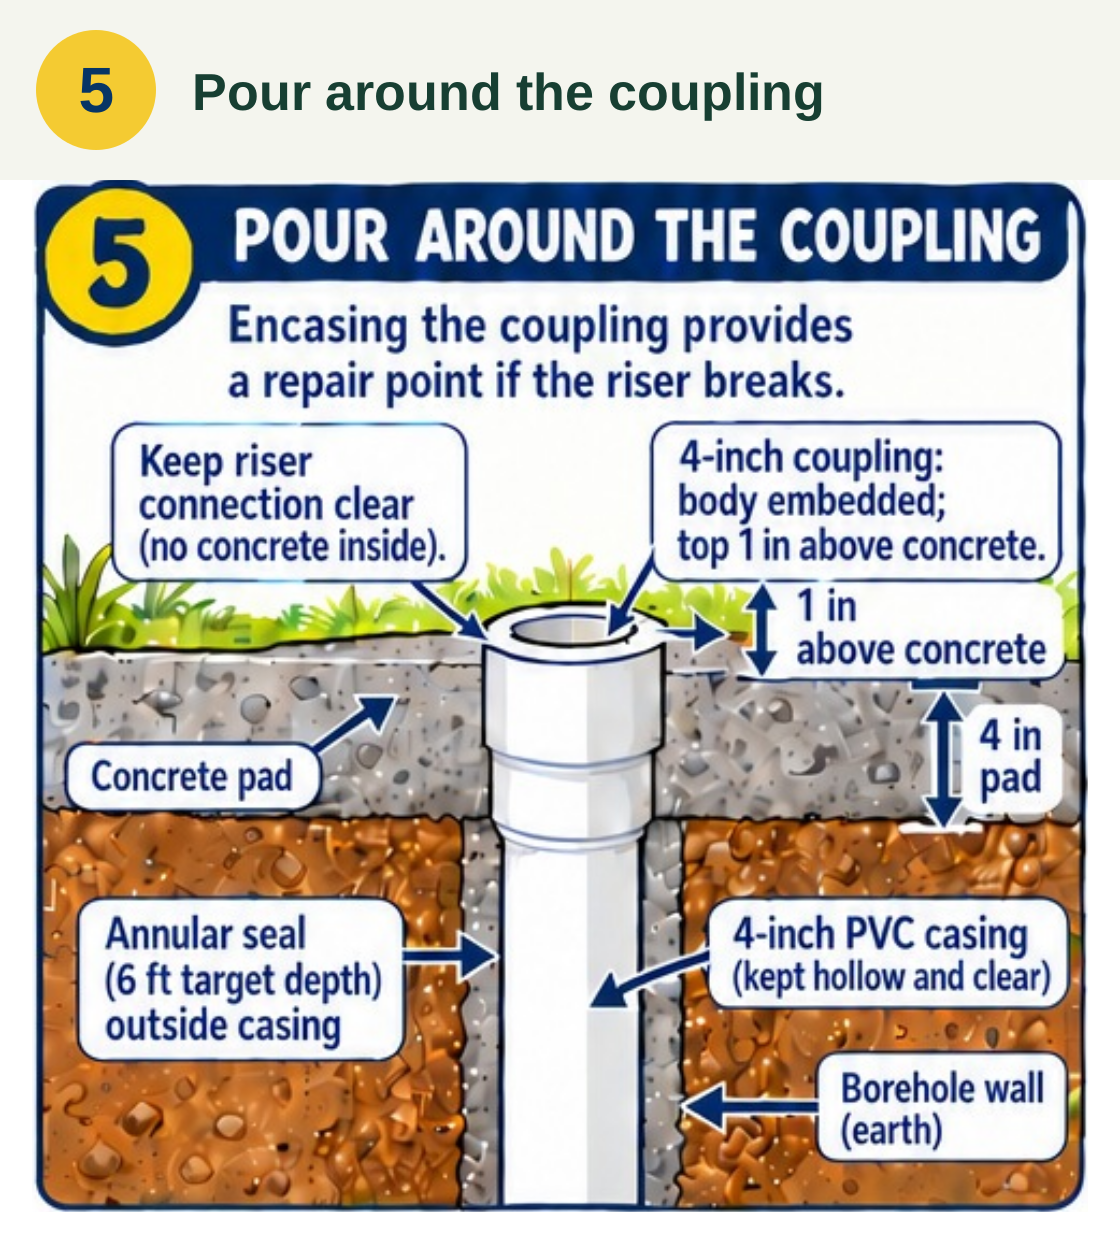
The concrete surrounds the coupler with 3 inches of its body embedded and 1 inch exposed above the slab. The inside stays clean and open for the riser. This connection gives the well a repair point: if the above-ground riser breaks, a replacement can be fitted without removing the whole base.
Pour the slab around the coupler so 3 inches of its body are embedded and 1 inch remains exposed. Keep the inside and riser socket clear of concrete. This embedded connection provides a repair point if the above-ground riser breaks later.
Step 6
Finish and protect
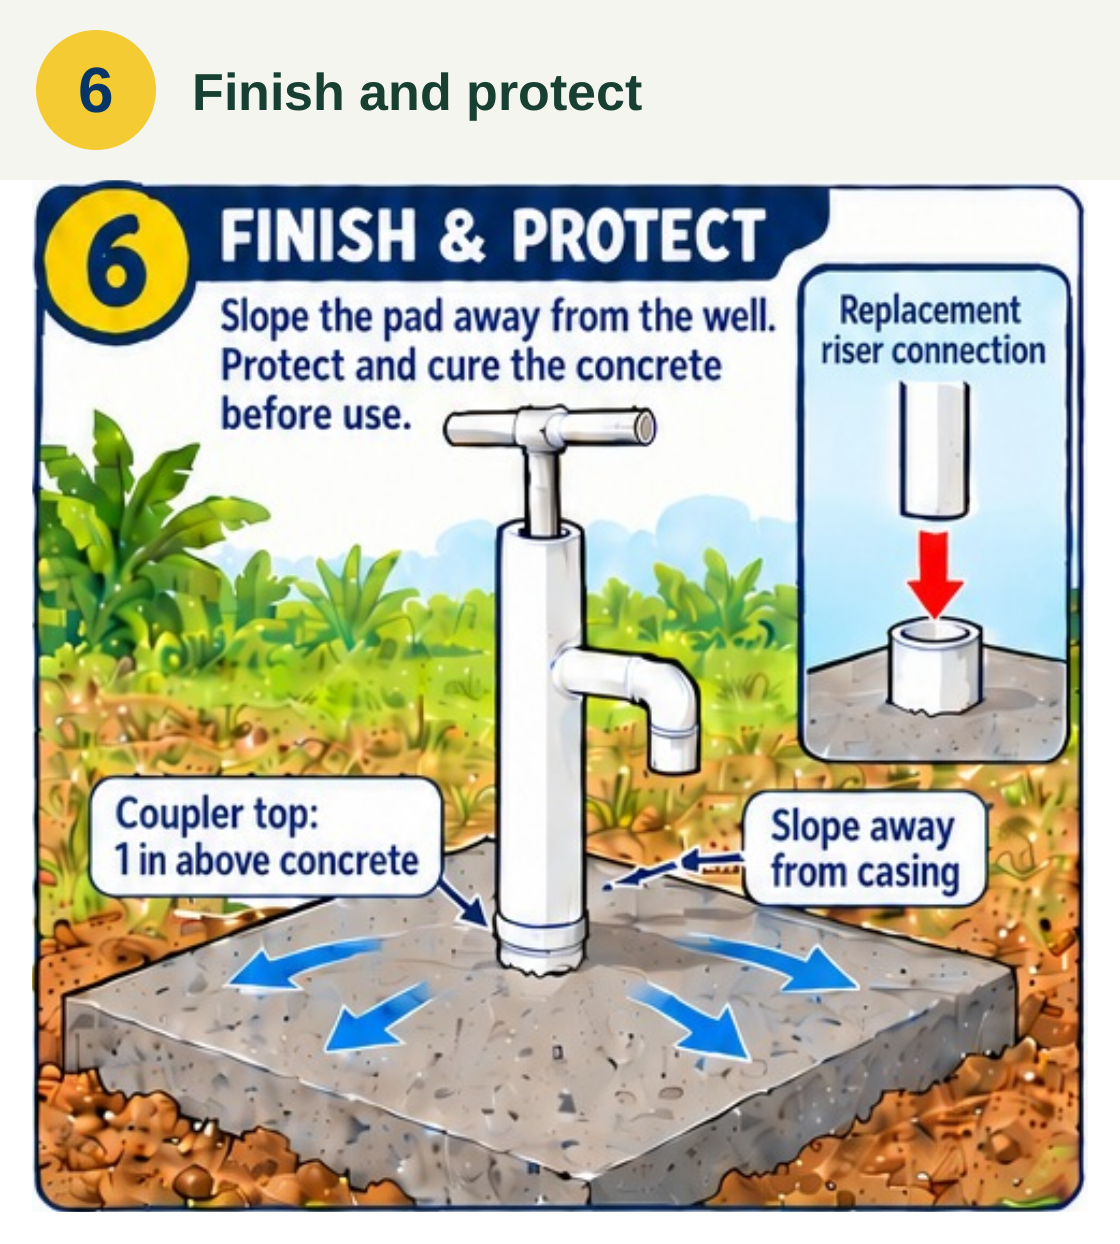
The finished slab slopes away from the well so rain and spilled water drain outward. It is protected while the concrete cures. Above it, the exposed coupler remains available for the riser connection and any future replacement.
Finish the surface with a slope away from the well so rain and spilled water drain outward. Protect the new slab and allow it to cure before use. Keep the exposed coupler available for the riser connection and future replacement.
Preview the complete print sheet
 See the illustrated steps
Construction details
Keep the casing clear while sealing outside
The temporary plastic skirt and loose soil come away before the permanent work begins. The crew keeps debris out of the casing while placing the seal in the roughly 1-inch gap between the pipe and the earth wall. The aim is a continuous outside seal about 6 feet deep, with a mix that can reach the full depth of the narrow space.
Set the cut and coupling heights
The casing is cut 2 inches above bare ground, and the 4-inch coupler is set in relation to the future slab. Three inches of its body sit in the concrete, with the top inch exposed above the finished surface. Its interior stays clean and open for the riser connection.
Form and reinforce the concrete base
Small aggregate and a workable mix help the sealing material settle down the outside gap, with a rod or stick used to help it along. The crew then forms a 4-inch-thick pad, ideally reinforced with rebar to help limit cracking. The concrete surrounds the coupler while its opening and riser socket stay clear.
Slope, cure, and preserve the repair point
The slab slopes away from the well so rain and spilled water drain outward, and it is protected while the concrete cures. The exposed coupler is a deliberate repair point. If the riser above ground breaks, that connection allows it to be replaced without removing the entire concrete base.